
A drop sleeve looks like this.

A little closer view...

Now, grab your seam ripper... Put a movie on the tv...
Sit back and take your sweatshirt completely
apart at all seams... Don't fret... We'll get it back together.
30 minutes later... Only the bottom ribbing seam unsewn.
Yep, this is gonna take awhile...

Ok, so that took 85 minutes, total.... Exactly the time it
Took to watch Pierce Brosnan in Live Wire!
This is what we need...two sleeves, the front/back piece,
and the bottom ribbing.

Now, carefully cut along the side folds of the body to
Make it into a front and back, like this.

Set aside the ribbing, sleeves, and back. It's time to cut
The front straight down the middle...I like to measure
and mark with chalk to make sure this cut is centered
In the front...

Sorry about the feet! ;)
Now mark the back the same way. But do Not cut!

Take the center back material in a piece just big enough
To cover the center of this back piece. How wide? About
wide enough to span the neck width plus 1-1/2" on each
side. Fold it lengthwise and cut on an angle from top right
corner down to 2" from the center fold like this...

Open the folded piece and pin centered to the back.
I next cut a few 1-1/2" strips of black for trim.
Press strips right side out the length of the WOF and
place with raw edges together on center fabric edge.

Now cut your next length of material, single width, 5"
at top and 2" at bottom...place it right side down
matching edges...pin and sew a 1/4" seam. Flip out and press.

Like so... now continue across both sides of back until it's
Covered... Looking good so far!


1/8" around to secure edges..Now trim along the edge
of the sweat shirt...

Not bad, eh?
Now to do the same to the front...

Next...sew your shoulder front seams to the shoulder
back seams. Zig zag or serge to finish the seams.
Now, find the middle of your sleeve cap and pin it to
shoulder seam.

Pin edges of sleeve cap to underarm edges and all in
between. Sew with sleeve portion on bottom, easing
in fullness as you go.


Serge or zig zag seam. Repeat for other sleeve.
Now it's time to make our cuffs for the sleeves.
Sew varied widths of strips together to make a
rectangle20-22" long by the width of the bottom edge
of the sleeve. Cut it into 2 rectangles 10-12" long by
width if cuff edge of sleeve. In my case, 8-1/2"...
Now sew them onto end of sleeve...
If strip is wide, trim even with edge of sleeve. Don't
taper the cuff. It will be turned under later making a tube.
Turn sleeve cuff back onto itself and hand stitch the edge
Turned under 1/4".
Turn jacket right side out and flip cuff up and out.
The cuff length is now adjustable to fit the wearer...
Now for the collar. Take the bottom ribbing.
Sew 1-1/2" strip to neck seam to turn under and hand
stitch Down.
Sew 2 1-1/2" binding strips together on short end.
Sew onto edge of front, across bottom and back up other
Front edge.
Turn under to back and hand stitch down...
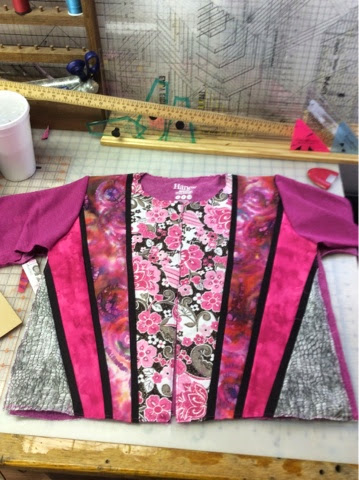
TaDa!!!
I loved your new looking T shirt.Its for winter now. Lol
ReplyDelete