Monday, December 29, 2014
Grand Illusion Clue 5
Wednesday, December 24, 2014
Clue 4 grand Illusion Mystery
Gotter done! Can't wait to see how this comes together!
And it's a good thing that it's finished, because DD and family came in today...now I'm up to my eyeballs in cooking...and Pa spent a good bit of his day with the eldest grandson in the shop turning a pen with him...
Ben did a great job! granddaughter made a popcorn cake! What's a popcorn cake you ask? We just happen to have a pic!!!!
Wednesday, December 17, 2014
Quilty Christmas Party... And Concert!
Yesterday was a long, fun day! We had our Tuesday Quilting Group party...Lots of great food, fun, and fellowship! One of our ladies brought an inherited stash of various and sundry sewing supplies and let us shop through it-- wow! I scored a metal tatting shuttle with a point on the end...I'd never seen one exactly like it... Several spools of yellow thread...was totally out of that.... Two tiny little brushes to get lint out from around the bobbin and feed dog areas, never seen those before either!....5 --1994 Quiltmaker magazines... My current subscription mag... Some netting for crocheting pot scrubbers and longarm quilting designs... And best of all, a package of hand applique pins! I've been looking for replacement ones for quite some time now as I've seemed to have misplaced mine....as in, it's easier to buy new ones than keep looking for them ...only it's really not, because I couldn't find any online... BIG SCORE!
Then we loaded up Lil Bit and headed to Big Spring for our Son's 6th grade band's Christmas Concert! What a joy to watch those youngsters' excited faces as they sat up very tall, tapped their feet, and professionally played their first ever Band Concert! I haven't smiled so much and enjoyed a concert so much since my own children were that age! It was totally amazing! There were solos, trios, rounds, and runs all coming from students in front of a standing room only crowd of probably not less than 500 parents, Grandparents, siblings and friends... Totally amazing! The group literally stepped up to the plate and hit it out of the park! Afterwards, we got the fun of eating with our son, daughter-in-law, and grandson at a fabulous Chinese buffet! All too soon, it was time to hit the road and haul it back home to Coleman... I bet I even grinned all night in my sleep! Thank you Lord, for giving us the good times to remember and cherish!
Monday, December 15, 2014
Saturday, December 13, 2014
Grand Illusion Clue 3
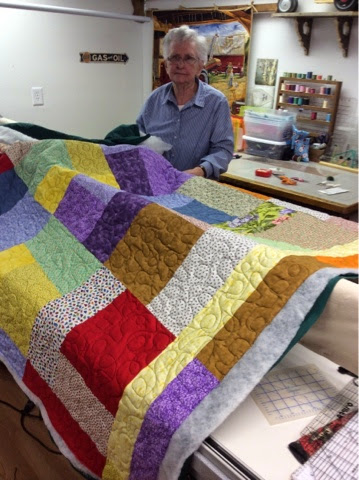
Had to finish a quilt for DD yesterday, before I could do too much on our mystery quilt... I added borders, quilted and bound her purple jelly roll race top...I also, for the first time did a totally machine bound binding...I tried them in the past and didn't like how they came out. DD wanted to learn a machine bound technique, so I watched Jenny Doans YouTube tutorial and this is how it came out...
Wednesday, December 10, 2014
Grand Illusion week 2
http://quiltville.blogspot.com/2014/12/mystery-monday-link-up-part-2.html
The above is the link back to the week 2 linky party!
And here are my offerings to week 2.
Tuesday, December 2, 2014
Tuesday Quilting...
One of my quilting group friends came to my place after lunch to quilt her Turning Twenty quilt top so she can donate it to the Child Welfare Board for Christmas! What a nice lady and a beautiful quilt! I think she did a beautiful job!
Monday, December 1, 2014
Grand Illusion First Clue!
Im having so much fun with Bonnie Hunter's Grand Illusion Mystery Quilt! We got our first clue last Friday...oh wow! Hundreds of HSTs and squares! So thankful for my Sizzix Fabi die cutter! I never dreamed it could be done this quickly! Here's my picture... As you can see, I cut 100 EXTRA black and yellow squares! I'm thinking they may be the start of another quilt in my future... For now, I just have to wait for the next clue on Friday!!!
Friday, November 21, 2014
Santa is coming...
Just finished some Christmas stockings and some toiletry bags for gifts... just wanted to share...
Saturday, November 15, 2014
Latest quilting...
I got Rach's jellyroll race quilt quilted yesterday and off the frame... Sent her these pics and asked about binding... Waiting for her reply... I thought it looked great! She did a wonderful job piecing it, and I love the colors ...
Front and back... Simple meander....love how it looks...
Thursday, November 13, 2014
Brrr....freezing!
They are 2" squares finishing at 1-1/2"! To me, that's very tiny! Just think, I only need a total of
600 of them! Yikes!
I got the last Sizzix die I ordered in the mail today... Now, I have the 2-1/2" half square triangle die, 2-1/2" square die, the 2-1/2" strip die, a box die, the flower die that came with the machine, and the mixed small circles die. A great start for Bonnie Hunter's new mystery coming up the day after Thanksgiving... Once she gives out the first clue, I'll know better what other dies I need to pick up next.
Thursday, November 6, 2014
Rachel's quilt...
Our daughter, Rachel, and her two children, Ben and Cara, came to visit over the weekend, then we all drove on Monday to San Antonio and watched our son, Sam and his high school band march for state marching contest at the Alamo Dome... Needless to say, I'm pooped! But, while she was here, Rachel quilted one of the 3 quilt tops she had brought to be finished, and I got it bound before she had to leave for home on Monday. I think she said the pattern was called San Francisco Windows. I thought it turned out beautiful!
Friday, October 31, 2014
Block of the Month!
Just got time to put together my 1st block of the month from Sew Sweet Simplicity. The sidebar on the right will take you to the site. I was a little intimidated by the small pieces and HSTs and flying geese. Definitely not a beginner block, but not rocket science either. I didn't get all my points 'spot on' but they are much better than I was afraid they'd be. The author has a few cool tricks up her sleeve that make it much easier to get the best possible results...
Gardening...
Last Saturday I planted a row of garlic... Today, Halloween, I planted a row of bunching onions, giant spinach and white turnips....and Marvin and I put the frost sensitive plants either under the carport or in the greenhouse. Marvin has spent parts of several days getting the greenhouse re-skinned and ready for winter... It looks like a whole different place... He also wired some light fixtures on the out side of the greenhouse and up under the patio so I can see Lil Bit in the dark better when I take her out to potty early in the morning and after dark at night..,. I picked up a jogger's clip-on flashing red light so I can see her better too... Sunday the time changes and I want to be ready... She is doing extremely well with her house breaking...amazingly so! We picked up a handlebar basket for Lil Bit to ride in when we ride our bicycles, so I put it on the bike and we made a maiden voyage to Sonic for an ice cream cone... she loved riding in the basket, don't you think?
Friday, October 24, 2014
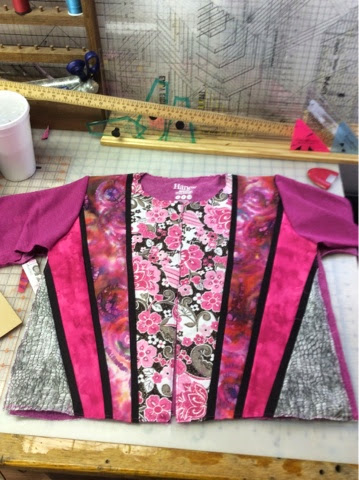
Sweatshirt jacket Day 1
A drop sleeve looks like this.
A little closer view...
Now, grab your seam ripper... Put a movie on the tv...
Sit back and take your sweatshirt completely
apart at all seams... Don't fret... We'll get it back together.
30 minutes later... Only the bottom ribbing seam unsewn.
Yep, this is gonna take awhile...
Ok, so that took 85 minutes, total.... Exactly the time it
Took to watch Pierce Brosnan in Live Wire!
This is what we need...two sleeves, the front/back piece,
and the bottom ribbing.
Now, carefully cut along the side folds of the body to
Make it into a front and back, like this.
Set aside the ribbing, sleeves, and back. It's time to cut
The front straight down the middle...I like to measure
and mark with chalk to make sure this cut is centered
In the front...
Sorry about the feet! ;)
Now mark the back the same way. But do Not cut!
Take the center back material in a piece just big enough
To cover the center of this back piece. How wide? About
wide enough to span the neck width plus 1-1/2" on each
side. Fold it lengthwise and cut on an angle from top right
corner down to 2" from the center fold like this...
Open the folded piece and pin centered to the back.
I next cut a few 1-1/2" strips of black for trim.
Press strips right side out the length of the WOF and
place with raw edges together on center fabric edge.
Now cut your next length of material, single width, 5"
at top and 2" at bottom...place it right side down
matching edges...pin and sew a 1/4" seam. Flip out and press.
Puppy play break!1/8" around to secure edges..Now trim along the edge
of the sweat shirt...
Not bad, eh?
Now to do the same to the front...
Next...sew your shoulder front seams to the shoulder
back seams. Zig zag or serge to finish the seams.
Now, find the middle of your sleeve cap and pin it to
shoulder seam.
Pin edges of sleeve cap to underarm edges and all in
between. Sew with sleeve portion on bottom, easing
in fullness as you go.
Serge or zig zag seam. Repeat for other sleeve.
Now it's time to make our cuffs for the sleeves.
Sew varied widths of strips together to make a
rectangle20-22" long by the width of the bottom edge
of the sleeve. Cut it into 2 rectangles 10-12" long by
width if cuff edge of sleeve. In my case, 8-1/2"...
Now sew them onto end of sleeve...
If strip is wide, trim even with edge of sleeve. Don't
taper the cuff. It will be turned under later making a tube.
Turn sleeve cuff back onto itself and hand stitch the edge
Turned under 1/4".
Turn jacket right side out and flip cuff up and out.
The cuff length is now adjustable to fit the wearer...
Now for the collar. Take the bottom ribbing.
Sew 1-1/2" strip to neck seam to turn under and hand
stitch Down.
Sew 2 1-1/2" binding strips together on short end.
Sew onto edge of front, across bottom and back up other
Front edge.
Subscribe to:
Comments (Atom)


